Adding images to your story

Enrich your story by adding photos

Use images to illustrate your story and give readers a clue to what the story is about. A featured image (think of it like a book cover) will appear: 1) at the top of the story; 2) on the home page when that prompt is current; and 3) as a thumbnail in the previews of the stories.

You can insert other images—as many as you wish—wherever you want in the story.

To add images to your story, follow these steps:

Step 1. Get the photo onto your computer.

Step 2. Upload the image into your Media Library.

Step 3. Insert the image into your story.

Step 1. Get the photo onto your computer

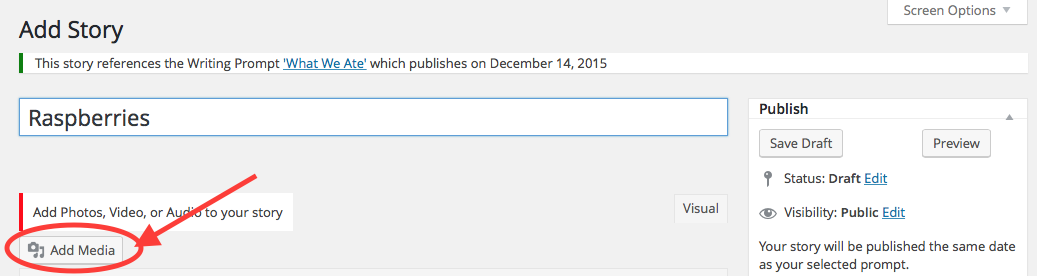
How you do this depends on where you get the photo.

1a. Use your own photo.

Your old photos can make your stories come to life. This is the time to share those period photos from old albums or shoeboxes!

Once you find the right photo, there are several ways to get it onto your computer.

Scan it into your computer. You’ll get the best results if you scan with at least 300 dots per inch (dpi) resolution. Tip: Crop the image in preview on your computer before scanning to get the best results.

Take a photo of the photo. If you don’t have a scanner, just use your phone to take a photo of the old photo. Then you can: 1) sync your phone’s image to your computer; or 2) email the image to yourself and then download the attachment to your computer. Save it onto your desktop, or remember where you filed it, and give it a name you will recognize.

Or, just use a photo that’s already on your computer.

1b. Use an image from the Internet.

If you would like to illustrate your stories with photos from the Internet, there are plenty in the public domain. This includes most US government images as well as many publicity photos for movies and TV programs. To find available photos, go to Google Image Search and enter your search term. When the images appear, click Search Tools, pull down the Usage Rights menu, and click Labeled for noncommercial reuse. All the remaining photos should now be usable in your story.

To download it, right-click or Ctrl-click the image from the website and save it to your desktop (or other location you choose).

Continue with:

Step 2. Upload the image into your Media Library.

Step 3. Insert the image into your story.

Step 2. Upload the image into your Media Library

Click Start Writing from any prompt to start your story. From the Add Story page, click Add Media:

Add Media

This will take you to your Media Library. Click Upload Files.

Upload Files

Either drag or drop an image from your computer into this window, or click Select Files, navigate through your folders, and select the image you want.

If there are other images you want to use in your story, click Upload Files again and repeat the process. Now they are in your Media Library, ready to be added to a story.

Insert Media

Click the X in the upper right corner to go back to the Add Story page.

Continue with:

Step 3. Insert the image into your story.

Or go back to:

Step 1. Get the photo onto your computer.

Step 3. Insert the image into your story

Once an image is on your computer, there are two ways to include it in your story.

3a. Insert the image as your featured image.

Your featured image is meant to give readers a clue to what the story is about. This image will appear: 1) at the top of the story; 2) on the home page when that prompt is current; and 3) as a thumbnail in a list of stories.

From the Add Story page, click Set featured image to go back to your Media Library, where you can select an image you’ve already uploaded.

Set Featured Image

(If you haven’t uploaded your image yet, you can upload or drag and drop it from your computer as explained in step 2.)

Featured Image

Set Featured Image 2

Click the featured image you want (a checkmark will appear). If you wish, enter a caption for the image in the Attachment Details section on the right. Then click Set featured image at the bottom right. You’ll see the image under Featured Image on the right side of the Add Story page.

Featured Image Set

If you don’t set a featured image, but your story contains other images, Retrospect will select the first one to use on the home page and as a thumbnail.

3b. Embed the image within your story.

To embed images within your story, put your cursor where you want to insert an image and click Add Media.

Embed Images

Again you’ll see your Media Library, where you can click to select an image or upload a new one.

Insert media 2

Once you select your image (a checkmark will appear), Attachment Details will appear on the right.

By default, your image will appear left-aligned in your story, occupying its own vertical space. You can also flow text around it if you wish. Below the caption field, under Attachment Display Settings, set Alignment to Left or Right or Center and Size to Medium or Thumbnail.

When you’re done with Attachment Details, click Insert Into Post at the bottom right. Back on the Add Story page, your picture will appear in the main text box, wherever the cursor was. You can drag it elsewhere if you wish. Lather, rinse, repeat.

Image Placement

Play around with image placement and alignment until you’re happy with it.


Preview your story

Before publishing your story, you can always click Preview to see how it will appear in Retrospect.

Preview


Go back to:

Step 1. Get the photo onto your computer.

Step 2. Upload the image into your Media Library.